Research
- Finlay
- Feb 1, 2022
- 10 min read
For this Project I will be making an scene in Unreal engine using props and models that I will be creating in blender. I plan to use the standard industry work flow that I have gotten used to to create different 3D models in a high poly style to eventually achieve a realistic look that will help bring the scene to life. To influence my design I will be doing some research first followed by some artwork to aid me in the 3D process, I will also be on the look out for tips, tricks and guides that I can take advantage of to help with any problems that I feel could arise during the production of my project. It is important to note that I will be focusing on the 3D skill set for this project as it is my personal progression path to become better at 3D modelling. This means that I will spend the majority of time for this project in Blender modelling but I will ensure that I still focus on other aspects of the project like Art and Unreal engine.
Island Research
Before I begin to research how I plan to make my models for this project I want to take some time to further explain my projects plan and how I will be displaying my models in Unreal Engine. The idea is to create models to help cover the theme of a lost island, this means that as well as having models of palm trees, grass, rocks and more I will also be needing a Island. I already have the knowledge on how to create an island in Unreal Engine but to further help with the design and looks of the island I have decided to look at one recourse in particular and that being a game called Sea of Thieves. I will leave a video below of me playing Sea of Thieves and showing you the type of Island I plan to create.
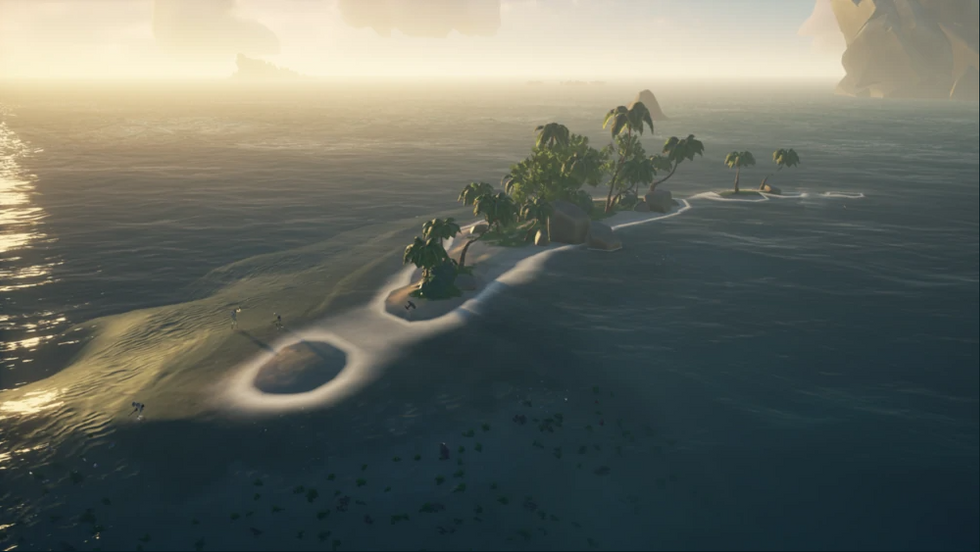
From the video above you can hopefully start to see the direction that I am starting to take with my idea for the island. As mentioned in the video I like all three islands I visited but I have decided that I will be using one in particular as reference, this island being Cutlass Cay. The reason for choosing this island is because it is very detailed but also very miniscule which is great for the size of this project, having to big of an island will cause to much stress and would probably have a lot of issue to solve compared to a smaller island. Now that I have taken one island to reference from I can start creating some drawn concepts for the shape of the island and what can be found on it to really start grasping the idea of how everything is going to be showcased. I will also leave some screenshots of Cutlass Cay below.
Cutlass Cay Imagery
Here are some reference photos for my chosen Island Cutlass Cay:
These two images help to show me more about the composition and the scale of Cutlass Cay and also show me what the island looks like with proper lighting. This gives me enough information to start planning the shape and design of my own island through concept drawing. I will start concepting with some very sketchy drawings but I will eventually narrow down to one high quality piece that will well display the idea I am pushing for. I may also include a photoshop version of my final sketch to further include colour theory and help display a more finished concept drawing.
Island Concept Drawing
Below I have drawn three different concept drawings to help expand my idea of how my island is going to look and just how I will be set out. Out of the three concepts I will choose a favourite and take it into photoshop to colour it and help it further display my idea. I will explain why I have chosen the island concept below along with my thought process to why I ruled the other two out.

Above is Island concept one which is actually just a drawing of cutlass cay I used as practice but later decided that it could be a very good option for my project so I decided to keep it as a concept. Overall I think it has a solid island shape and I really like the size.

Above is Island concept two, I really love how this concept brings out the idea of an island that has eroded slightly and has been flooded down the middle making it seem that there is a part of the island that is disconnected. This will definitely be harder to create in UE4 but I do like a challenge so I am well on board with this idea.

Above is the final concept, Island number three. This Island is more simplified as it has a whole shape with no strands of island disconnecting from it. This is simple but very effective for working quickly and within the projects time frame. However I feel this one is definitely not as interesting as the first two concepts.
Now that I have showcased all three concepts it is time to decide which one is going to be moving on to photoshop. In my opinion I am a fan of all of them but for me one concept sticks out the most. This concept being Island number two, as I feel it possesses more of a challenge and is very unique compared two the concepts. With the decision now made I will be taking Island number two into photoshop and re-creating it in colour to help emphasize the idea of the Island. I will Leave the Photoshop art below:

As you can see above I have successfully created Island Concept two in Photoshop and I have coloured it in the help show what the Island would look like in more of a finished state. I am very happy with how this photoshop turn out as it is very basic but it really helps display the colour theory behind my Island concept. I can now say that this concept is enough reference for me to fully create my island with confidence and I now have a very clear idea to what my Island should look like when I come to making it in UE4.
Identifying Problems to Solve
Now that I have completed my concept for my island and I have a clear idea of what it is going to look like, it is time to pre-solve some problems that I could see myself running into during the creation of the island. Because my island is split into two separate areas I wont be able to just use a flat landscape, I will have to sculpt up using the tools provide in UE4. I am familiar with the process when sculpting but I am not to confident when it comes to foliage and texturing the sculpts so I have done some research and I have found some video tutorials showcasing how to do this. I have also added some extra videos below like how to make a beach and how to use a ocean generator that is more controllable and customisable that the default UE4 plugin. I will leave the videos below:
With the first part of my research complete it is time to move on to looking at how I will be making the models for this island like trees, rocks and grass. I will be looking for any problem solving solutions I can find that will help with creating my models along side also doing some research mood boards into what textures, and what type of in real life references I should be using to aid my processes.
Modelling Research
Now that I have researched and created concepts for my Island, it is time to start looking at research to help with the modelling for this project. My modelling for this project is going to be high poly and I aim for my models to look fairly realistic. This means that instead of creating concept art and drawings for the models, I will be instead looking at making mood boards that help display what the trees or rocks should look like from a in real life standpoint. This ultimately means that my concepts and references are going to be from images rather than drawings. I will also be researching texture mood boards to further help me when it comes to texturing my models.
Palm Trees
The first model I want to create for my island is going to be a palm tree. This is a very essential detail for any exotic island so mine is for sure going to include one. This asset should hopefully be as realistic as possible as that is the art style I have chosen for this project. Below I will start researching by leaving a mood board containing real life images of palm trees that I am looking to use for my island.
As you can see this mood board presents a clear idea as to what palm trees look like but also to what features they have that will be necessary to recreate in my own model. I also think that from this mood board you can see that each palm tree can look different depending on their location, for example California palm trees are really tall and skinny with not many leaves compared to beach palm tress that are shorter and have much more leaves.
Sketch Fab Palm Tree
I have decide that as well as using mood boards of real palm tress I am also going to look at palm trees made by other people in 3D. For example I have found some work on sketch fab of a palm tree that looks like the one I would like to create. Below I will leave some images of the palm tree from sketch fab in different forms such as wireframe, normal and post rendering to give me an even better idea as to what I should be trying to make my palm tree like.
Identifying Problems to Solve
Now that I have established some ideas on palm trees I am going to start thinking about how I can pre-solve any problems that I may face when modelling this asset. When I think about modelling a palm tree, the actual tree is very simple, but I am not to confident at making leaves as they have to be as realistic as possible to match the theme of model. With this problem in mind I have dedicated some time to researching into tutorials on YouTube which I feel should help me overcome this problem. The videos I have found are very good at showing the process of designing a tree that has very detailed palm leaves so this should really help with my problem. I will leave the videos below.
Rocks
The second model I am going to create for my island is a rock or a collection of different ones, this is once again an essential item to any island so I will definitely be making some for mine. Like with the palm tree this asset needs to be as realistic as possible to fit the theme and art style for my project. Below I will start researching by leaving some images of real life rocks in the form of a mood board.
As you can see above this mood board presents a clear idea as to what rocks should look like especially rocks that are located in a beach environment. This mood board really helps to see the different type of textures rocks can have as some are smooth and very basic and others are very jagged and pointy. This is a variation that I want my Island to have as not all the rocks are going to be the same because that wouldn't be realistic as in real life no rock is the same. This is definitely something to think about when modelling.
Sketch Fab Rocks
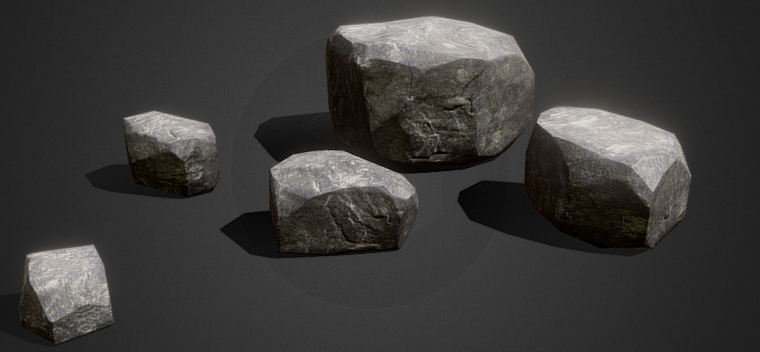
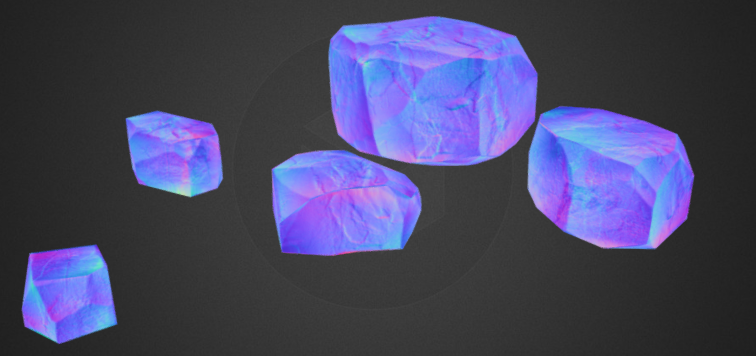
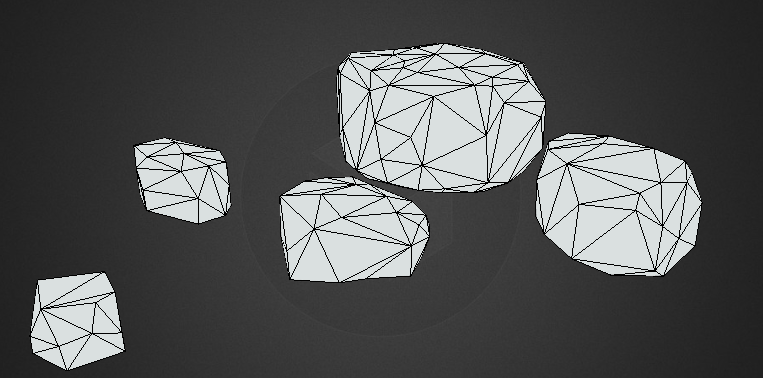
I have decide that as well as using mood boards of real rocks I am also going to look at rocks made by other people in 3D. For example I have found some work on sketch fab of a rock set that looks like the one I would like to create. Below I will leave some images of the rocks from sketch fab in different forms such as wireframe, normal and post rendering to give me an even better idea as to what I should be trying to make my rocks like.
Identifying Problems to Solve
Now that I have established some ideas on rocks I am going to start thinking about how I can pre-solve any problems that I may face when modelling this asset. When I think about modelling some rocks I defiantly feel the need to sculpt to make the shape more detailed as rocks can carry allot of detail. I know the basics of sculpting so that shouldn't be a problem but one problem I might potentially run into is the bake down process that is required in order to make my assets poly count stay in the thousands rather than the hundred thousands. I have been doing some research and I have found some refreshing tutorials on how to bake down models and textures as well as some great videos on how to created derailed rocks in blender. I will leave the videos I have found below.
Texture Mood Boards
Now that I have researched what my models are and how I plan to achieve making them, it is time to look at some real life images of there textures. From these texture mood boards I should be able to see what it is I need from them in order to replicate their looks and design so that I can make my models just as realistic when I paint them.
Starting with palm trees here is a texture mood board for the trunk of the tree. I shall leave the mood board below:
As you can see from just this small mood board alone, there are lots of different textures for the trunk of a palm tree. All these texture give me a very good representation as to what my tree should look like. This mood board will be a key reference point when I have finished modelling and I am ready to texture my tree.
The next texture mood board is once again for the palm tree but this time for the actual leaves of the tree. I shall leave the mood board below:
As you can see from this mood board above there are not many different types of palm leaf for the palm trees which means finding a texture for my model is going to be more direct and maybe even easier as palm leaves seem to be very universal in terms of the properties they share. Either way this mood board is still going to prove useful when I am looking to make my leaves for my palm tree.
The final texture mood board is going to be for the rocks. I shall leave the mood board below:
As you can see from this mood board above there are lots of different types of rocky textures, that in my opinion would all suit the role for my models. Having a wide variety of textures to choose from is great as it means I can make lots of different types of rocks and paint them all with slightly different textures to make my island feel more random in the way that the rocks are formed and addressed. This mood board is going to be a very useful reference for when I start designing my models and painting on there textures.


Comments